Welcome to the help section
Supplier Direct Ship PO (via Supplier Branch)
Part one: Purchase order management for direct shipping via suppliers’ location:
This Amway/Access Business (ABG) group supply chain model involves purchasing finished goods from specific suppliers. Planning the replenishment of these finished goods is called Buyout Planning. The buyout planning process involves the submission of a purchase order (typically an OU for a buyout SKU) to the supplier. ABG may ask for the ordered product to either ship to an ABG warehouse location OR ship directly from the suppliers manufacturing location (aka supplier dock or branch plant).
This process covers the direct shipping via a supplier’s location and will eliminate many manual steps, confusion and rework for our suppliers and ABG.
Note: OP purchase orders for raw/component materials may also be part of this direct ship supplier location processes.
Process Overview:
PO processes for this supply chain starts with a Purchase order where a total quantity is issued on a one OU order type PO line.
The supplier acknowledges this lump sum one PO line and
OLD MANUAL: the PO stays in this state throughout its life cycle.
NEW AUTOMATED: enhancement, for this specific supply chain is once the supplier acknowledges this one line lump sum PO, the ABG planner will
- breakdown the total quantity of the one line OU PO into multiple PO lines (when ABG’s demand stabilizes – timing will vary).
- They will update the specific Amway affiliate ship to address on each line where that specific quantity is going to.
- The carrier code may also be updated on a given PO line item (air or truck vs. ocean).
Supplier will still receive a SOMP PO revision email notification for this PO and will now be able to see the PO lines broken down by ship to and carrier code, in SOMP. These direct ship type of purchase orders will still be visible in view, acknowledge/revise PO mode, PO print, but in a new way. To identify a direct ship PO, within these screens, the PO header Branch Plant will show the suppliers manufacturing address, in the view/acknowledge/revise/print screens.
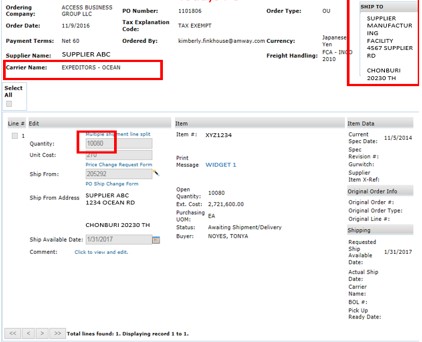
Below is a side by side screen shot of what the PO looks like today to our supplier:
A. In SOMP today, the carrier is displayed in the header along with the ship to for all lines including direct ship one line, lump sum quantity. There is no carrier or ship to at the PO line detail.
NOTE: non-direct ship PO’s will still display and look like this (first screen shot below).
Via the new enhancement – PO line breakdown by ship to’s:
B. New enhancement: after the supplier’s branch plant (manufacturing address) is displayed in the header (not the ship to), but the carrier is no longer there.
The carrier is now at the line detail along with the Amway specific ship to addresses for each discrete quantity.
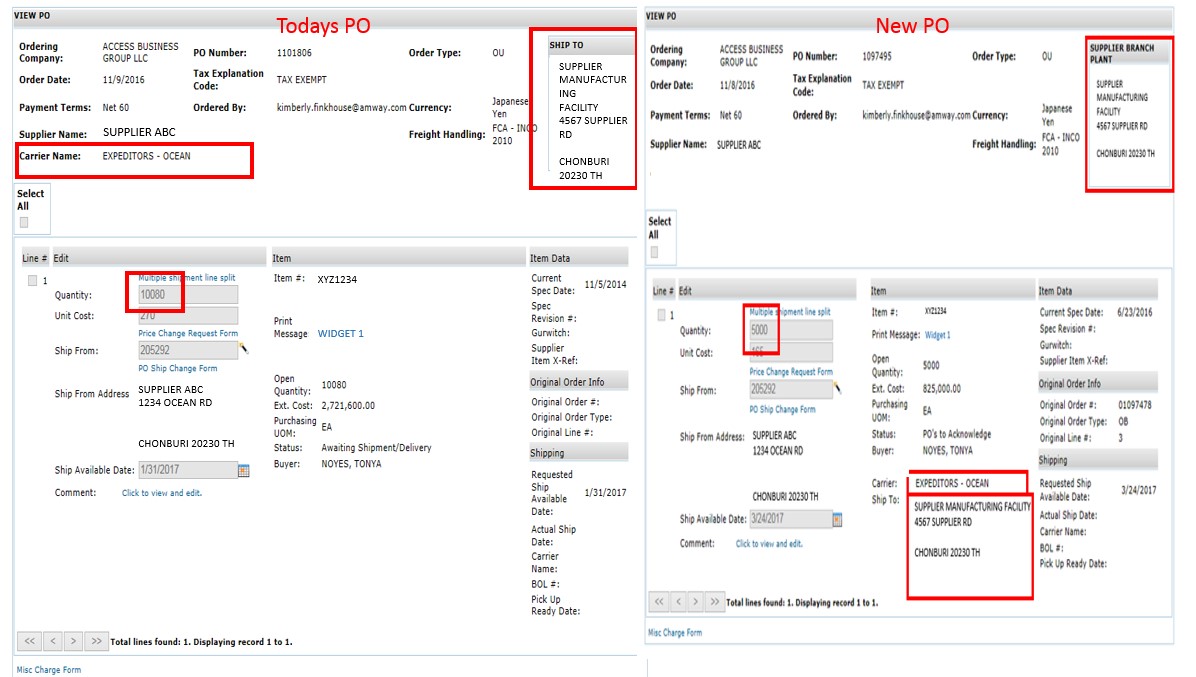
The screen shot below displays what a new one-line PO will look like when the supplier receives the PO for the first time.
- The PO will display the one line lump sum quantity to begin with – same as before.
- One carrier mode.
- The PO will display the Ship To in the header of the PO (suppliers manufacturing address).
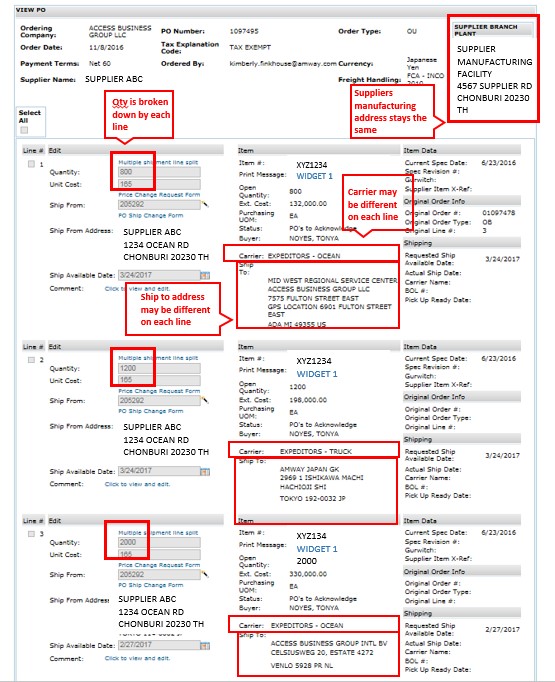
Revised PO (will be sent on SOMP email notification just like an PO revision):
After supplier acknowledges the one lump sum PO, the planner will:
- breakdown the total quantity of the one line OU PO into multiple lines and update the specific affiliate branch plant ship to on each line where that quantity is going to. Note that one PO line with just one different ship to may also appropriate.
- Carrier codes may also revise & need to be paid attention to (ocean, air or truck mode).
Suppliers must acknowledge these PO line revisions making special note of the ship available dates, each ship to location AND carrier codes on each line and update their system accordingly. Contact the ABG Planner for PO shipment inaccuracies.
IMPORTANT NOTE: PO lines across several PO’s going to the same ship to destination and on the same shipment, must have the same Ship Available dates on those lines.
This will assist with the shipment submission next steps and allow for more accurate on time scoring.
Please to go the next section “submitting shipment details” for specifics on this new procedure.
Here is an example after the breakdown for 3 PO lines for suppliers to acknowledge:
Part 2: Submitting shipment details for a PO shipping directly from a supplier’s location
This new SOMP process covers the supplier’s entry of their shipment details for when Amway places an international direct ship PO (from the supplier’s location to an Amway affiliate location).
As highlighted in part one above, the direct shipped PO acknowledgment process enhancements, helps to assist with the front-end PO management, and builds the foundation for the shipments ease of management.
Part 2 enhancements eliminate many of the current manual steps (emails, phone calls, follow up), confusion and rework for our suppliers and ABG. This new enhancement will net more accuracy for shipment timing and paperwork, allows for more flexibility for suppliers, better visibility of the shipment and a major time savings for both companies!
*** Please note that the supplier’s employee doing the Direct Shipment Submission should have at least the Customer Service PO/Transportation role. This role is required to be able to go into the PO and revise the ship available date if needed. Supplier Administrators may need to revise their role in SOMP.
How to find the PO’s on a specific direct shipment to submit the shipment details
Submitting PO Shipment Details
Mode/Carrier for the shipment
Enter in PO line shipment details
Complete the Shipments Header information
When shipment header & detail fields are completed and accurate
Multiple Containers
Saved as Draft shipment; retrieval & completion
Submitted Shipment inquiry
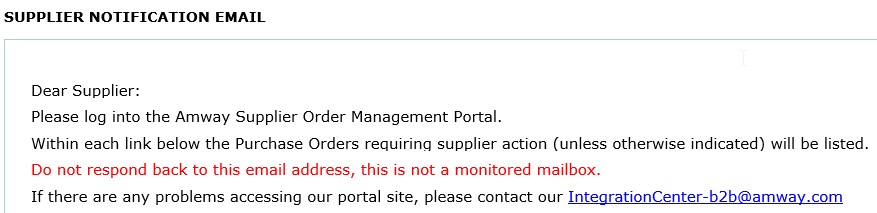
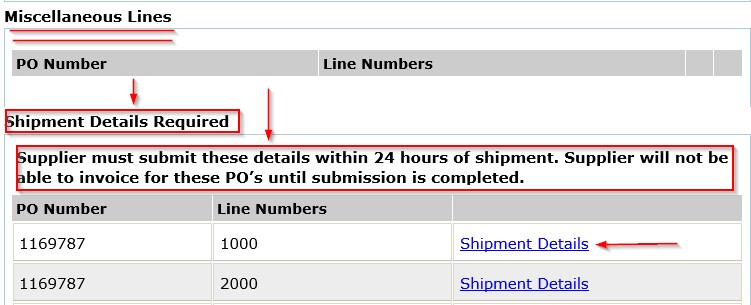
Notification that a Direct Shipment submission is required on a specific PO:
If you are set up as a supplier to manage this direct shipment process in SOMP, the daily email notifications, will now include a new Shipment Details Required section in it; which is below the Miscellaneous Lines section.
The verbiage here under this title is very important to comply with so your submission is entered accurately into SOMP only AFTER the PO products are completely loaded into the shipping container. This submission then allows invoicing for these PO’s in SOMP:

Using the hot link on this email functions like the other hot links; and toggles you right to this new form after logging into our portal; when clicked.
There are 2 other ways to access this new Shipment detail form within SOMP.
- Via the home page, My Daily Tasks, 3rd choice under shipments:
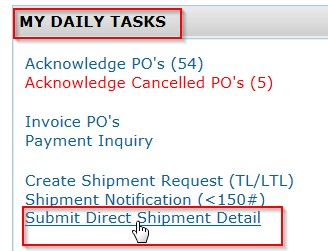
OR

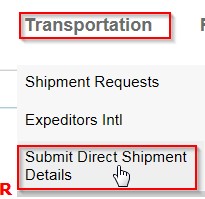
2. via the top header ribbon under the Transportation drop down
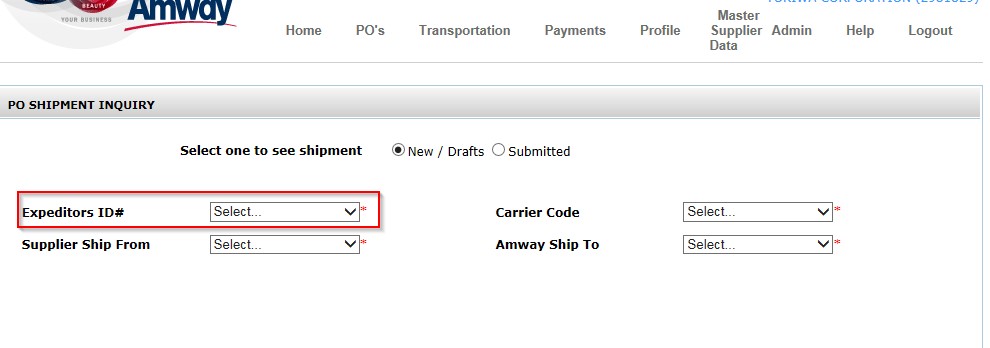
Step one: How to find the PO’s on a specific direct shipment to submit the shipment details:
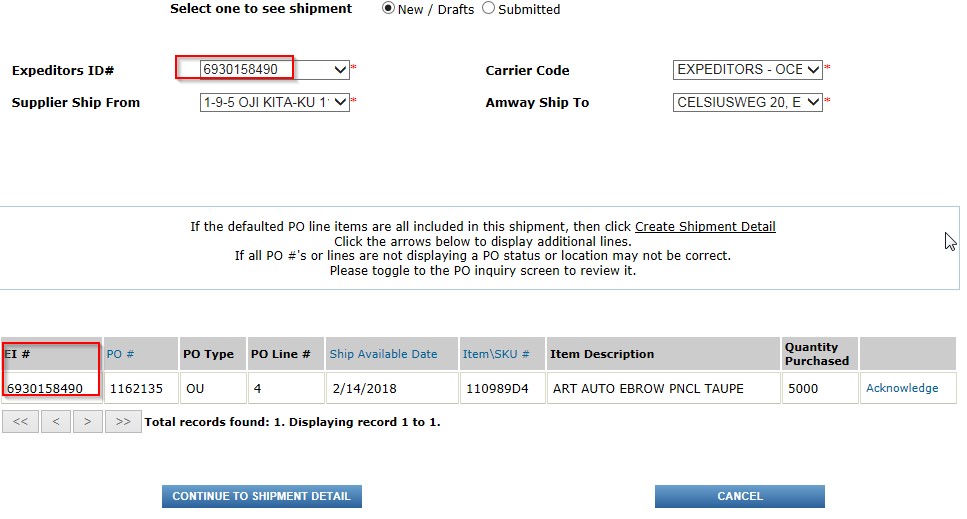
Once in this Direct Shipment Details form; it behaves like the PO inquiry to find all eligible shipments for your PO’s. Note that all 4 fields are required to have data selected to move forward.
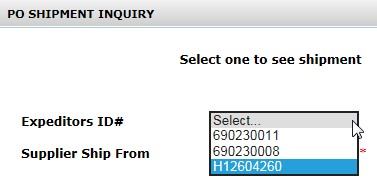
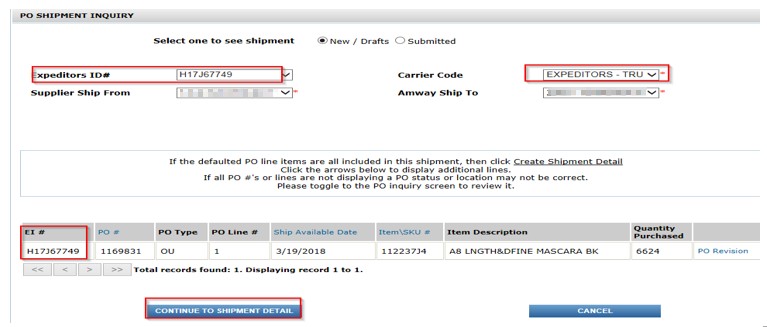
If a booking request via Expeditors, has been completed for a PO shipment and you know your booking Expeditor ID # then:
>Click on this first Expeditor ID # drop down field and start to type in that ID # number until is shows up to select it.
-In the 2nd screen shot below, “H” was typed (truck shipment) and the curser went right to the H12604620 <enter> defaults into that field
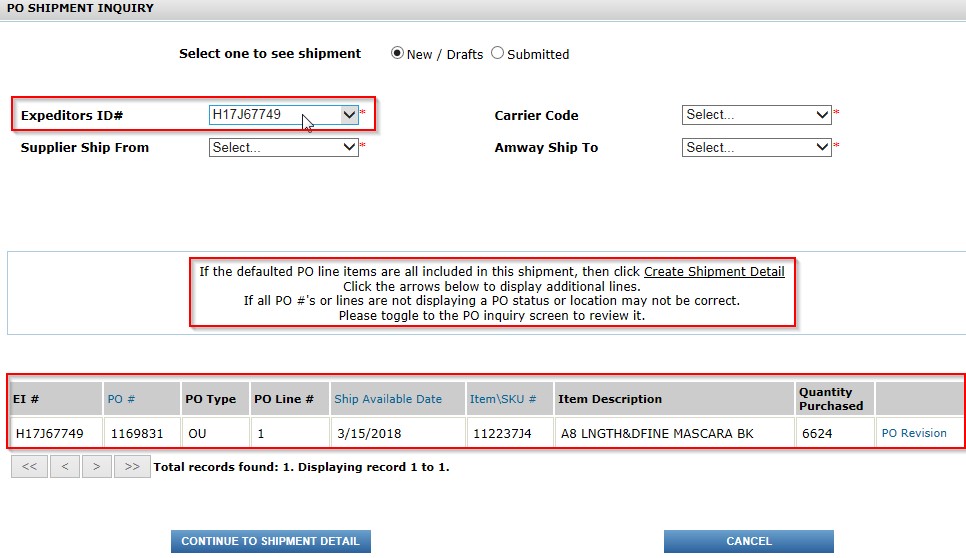
Once selected, the PO line(s) that are part of that shipment will default below.
And the other 3 required fields (Carrier code, ship from, Amway ship to) will default in the correct set up for this shipment (carrier code; ship to; ship from must all be the same for one shipment).
Please note the verbiage in the middle of the page if not all your PO lines are displaying under this ID#.
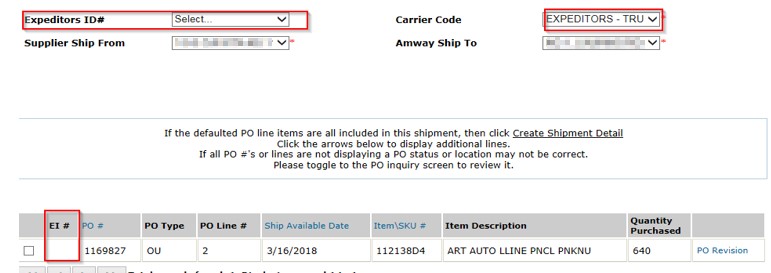
If the Expeditor shipment ID # is not known; the other 3 drop down fields are to be used to find PO’s.
Note: For truck or air only: if Expeditor’s in not moving the shipment the carrier codes will still show “Expeditors”.
1. Select first the Carrier Code:
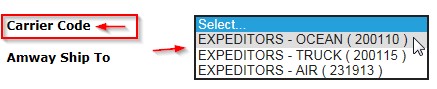
2. Then the Ship To destination of the PO shipment:

Note that Amway’s location # is in the ( ) behind our address:

3. Select the supplier’s ship from destination for this PO shipment:


Once all 3 fields above are selected, the Expeditor ID# must then be selected.
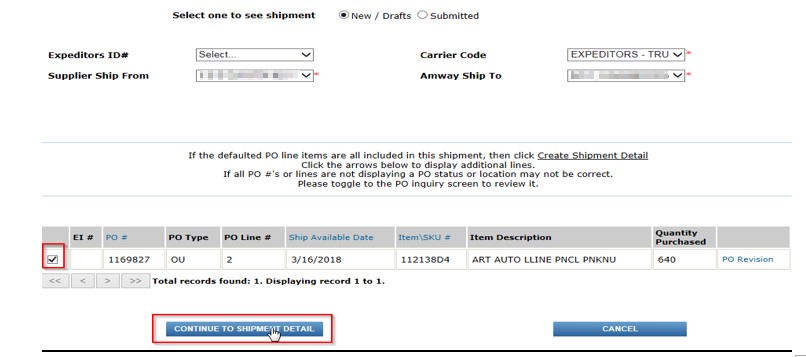
There is no Check Box visible to have to select these lines; it is preselected based on the ID # selected.
If you selected a value in error;
Click the 
button (bottom right) to clear all required field data.
OR
go back to the “Select” option in the both:
Expeditor ID field  & Carrier Code field
to enable picking a different carrier/ship to or ship from to find the correct shipment and PO’s on it.
Note: The form may take a moment to refresh to show all options again:
browser tab shows this:  when refreshing & this when done:
.b. Non-Expeditor managed shipments: Truck or Air only
- Supplier is managing this shipment on their own & not via Expeditor so there will not be an Expeditor ID # for these shipments but the carrier codes will still show “Expeditors-Truck or Expeditors -Air”.
- If that is not correct, then contact Expeditors asap to get this PO shipment booked and in about 24 hours, the ID # will show up here to select.
Note: These 2 required fields (ship from; Amway ship to) will not default in if the shipment is not managed via Expeditors and will manually have to be selected.
Follow steps 1 – 3 above and select the specific truck or air carrier code, ship from, ship to addresses.

Notice that on this example below this Truck shipment doesn’t have an Expeditor ID # & “Select” stays in that field:
And notice that this truck shipment does not show an Expeditor # in the PO line detail:

5. Continue on to the Shipment Detail form to submit all required information
Select the PO lines that are part of that specific shipment and click this button: 
Expeditor shipment example:
Non-Expeditor shipment example:
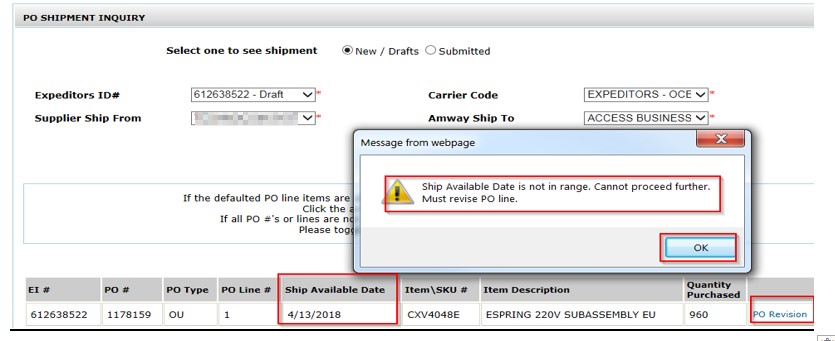
A. The PO’s lines must be in acknowledged status to allow it to be selected and if not:
1. For Expeditor shipments

a pop-up box defaults:

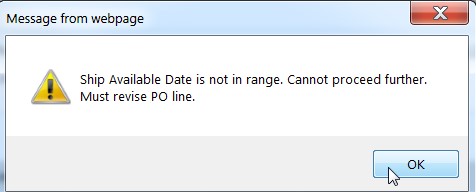
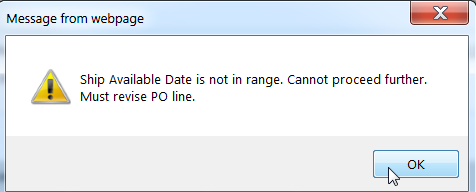
B.PO line won’t even display in this first screen if the Ship Available date is beyond 10 calendar days

C.Ship available date is in the past (see above 2/15/2018).
This date must be revised to the current days date or within the next 10 calendar days, to allow selection.
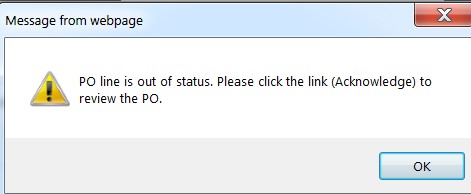
Clicking on  will net this pop up box
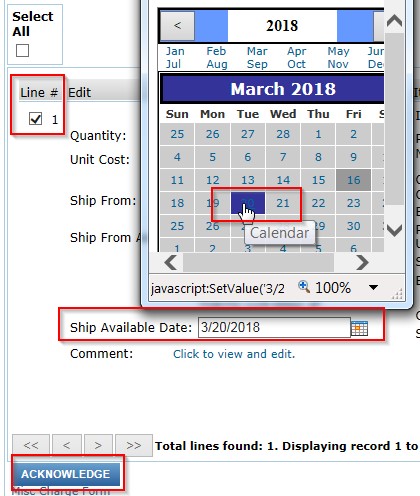
Then revise the ship available date on the PO line and Click Acknowledge or Revise to save the change – see pop up confirmation box:
To get back to the Direct Shipment Detail inquiry screen, there are 2 ways to do this:
1.Use the top header ribbon under the Transportation drop down
2.OR Click the upper left browser arrow  to cycle backward, through the same screens the same way it navigated to revise the PO line:
Note: this pop-up box
shows up again, just click OK again to get back to the specific shipment.
This may take a couple of clicks to get back to this direct shipment inquiry depending on the task performed and you will need to refresh the screen so the PO line edits display (click F5 for refresh).
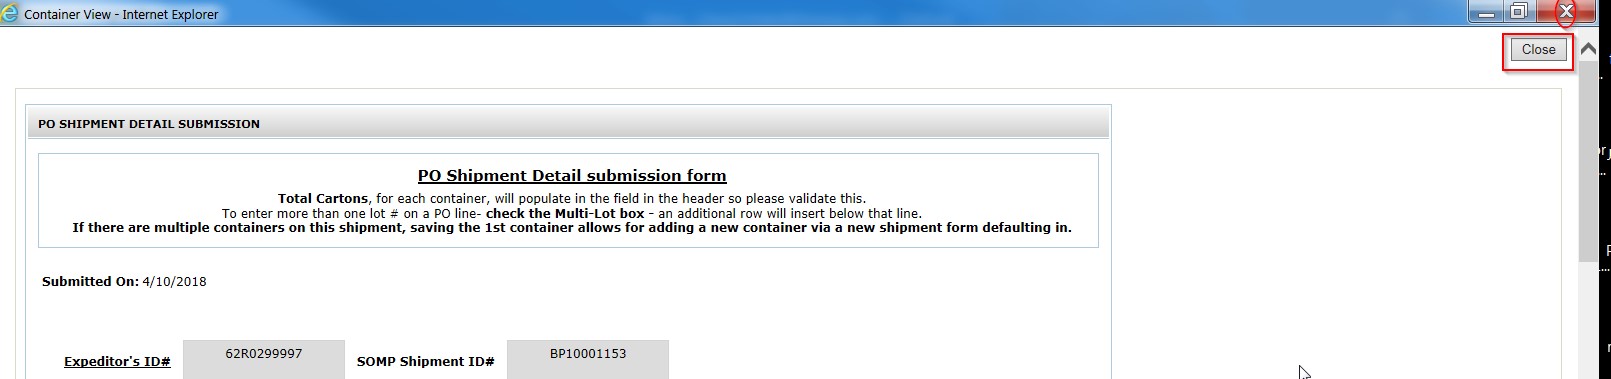
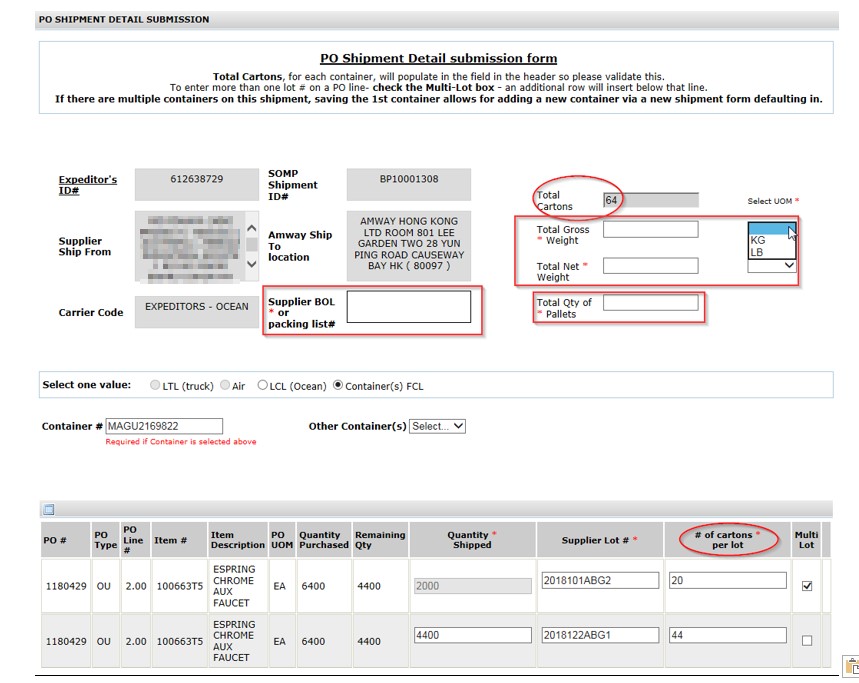
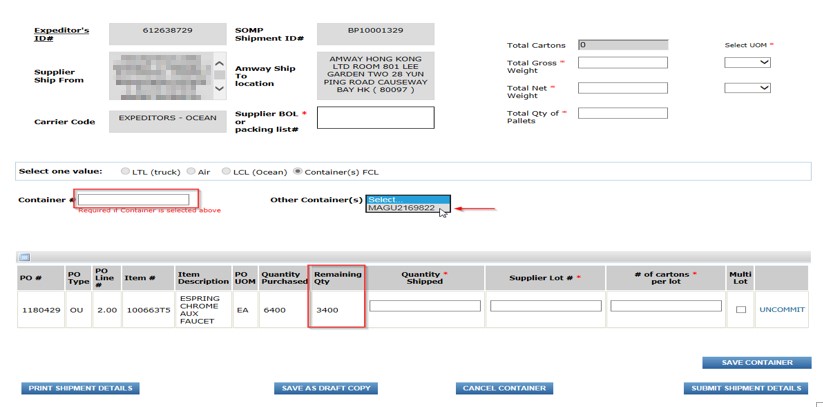
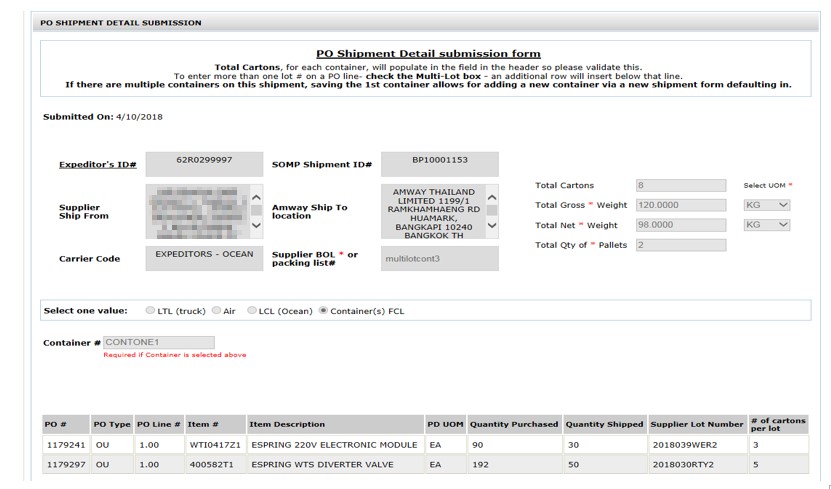
Step Two: Submitting PO Shipment Details
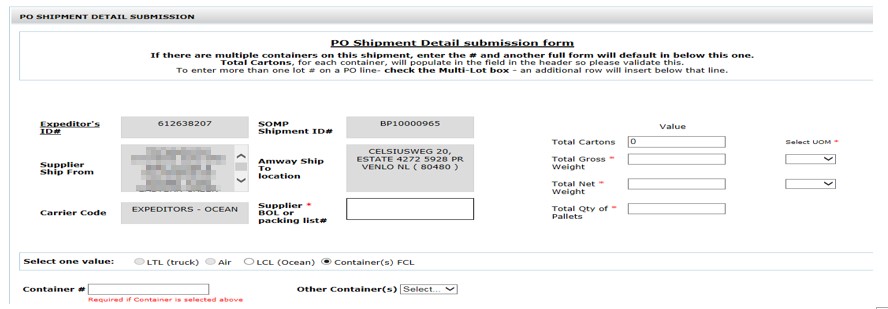
Clicking this button: on the inquiry form toggles to a second form that allows entry of all the shipment specifics that a packing list or BOL would list.
This SOMP submission form allows suppliers to print of all these details out, after they are saved.
Notice that specific fields are already populated: Expeditor ID # & SOMP ID fields: mode of transit for the specific shipment; the ship to & ship from addresses.
Important functionality to note:
- If Expeditors IS managing this shipment:
A. The Expeditor’s ID # will be the # you were advised and select already and is unique to the SOMP ID:

B. Saving as Draft is an option for these Expeditor managed shipments.
IMPORTANT NOTE: Shipment must be booked through Expeditors and container numbers assigned before saving as a draft since once Container # is entered and saved, it cannot be revised. Draft would need to be canceled if shipment or container # within it, changes.

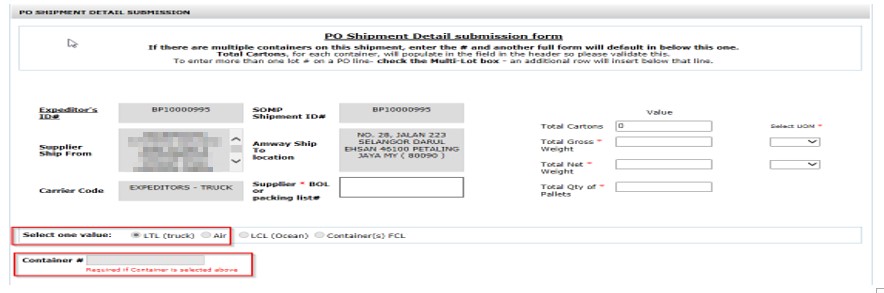
- If Expeditor’s is NOT managing this truck or air shipment:
A.the Expeditor ID # field will be filled in with the SOMP ID#:

B.Saving as Draft is not an option for these shipments – see icons at the bottom of the form change.
i. Either submit completed details or cancel shipment to start over.

Step Three: Mode/Carrier for the shipment
A. For Truck & Air shipments:
the carrier mode defaults into the correct selection and no Container ID # is required – that field is muted out:
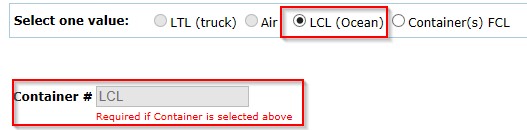
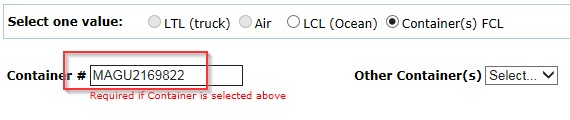
The correct OCEAN type must be selected before filling out the other line detail fields:
1. If LCL (less than container load) is selected “LCL” will default into the Container # field & and cannot be updated:
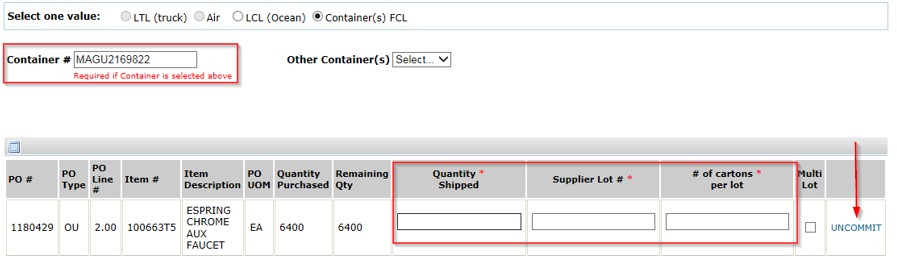
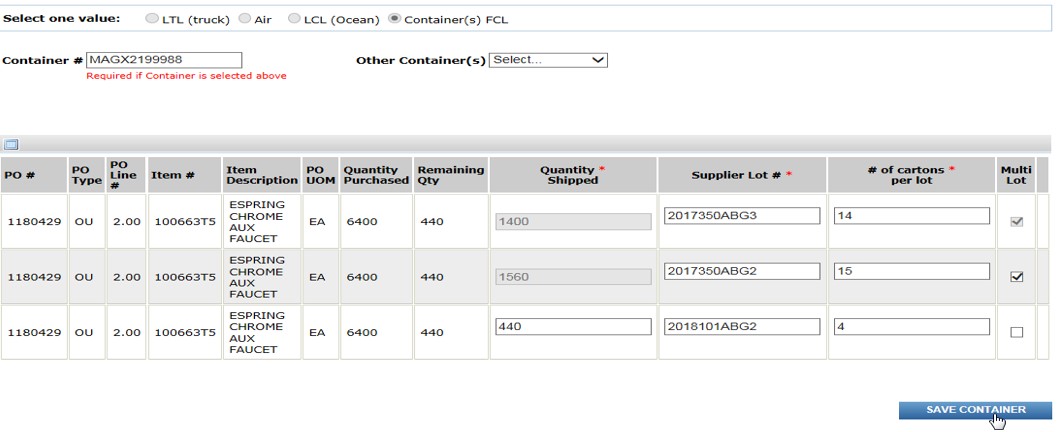
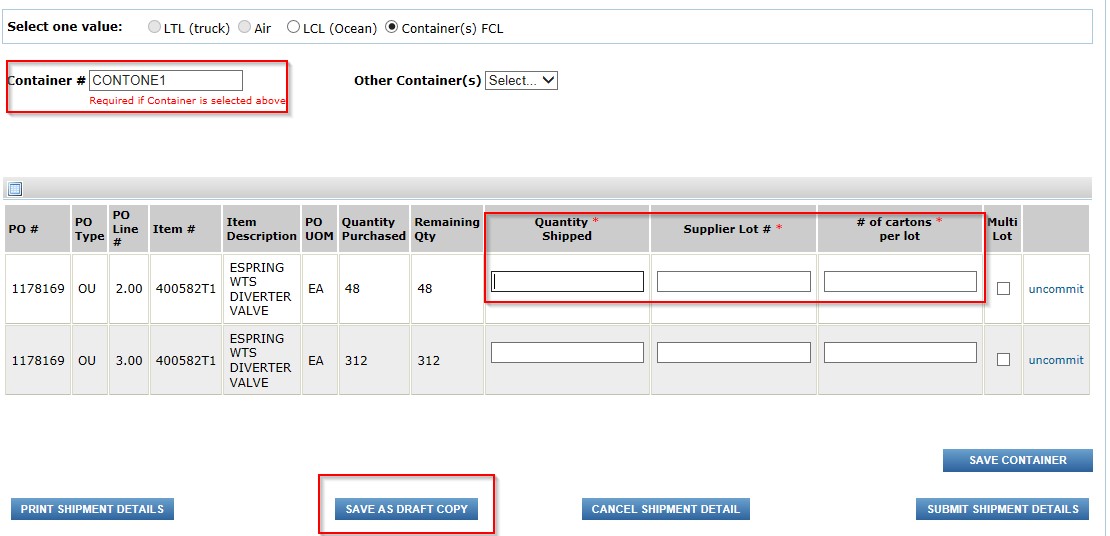
Step Four: Enter in PO line shipment details – this is the same process for Air/Truck/ Ocean freight
1- Enter the exact quantity shipped on this shipment for this PO line; for each unique manufacturing lot #
2- Enter the lot number* for the item produced (this field defaults as CAPS).
A. NOTE: For finished good items: Amway issues suppliers a 3-digit lot base code; which is retrieved when acknowledging the PO line in SOMP via the PO’s item description:
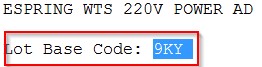
and the 11-digit or 8-digit Julian code: YYYYDDDABC1 (1st,2nd 3rd shift) (e.g. 2018040ABC1/8040ABC1), must be exactly what is labelled on the actual product cartons and its paperwork for this shipment.
*Work with your Amway Buyer for further clarification on supplier lot compliance processes.
B. If no Amway lot base code has been issued – the supplier’s production lot # must be entered.
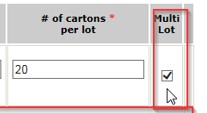
3-Number of cartons for that shipped lot quantity
Note: example below is for OCEAN multiple containers – then this  link displays (note: this is not applicable for LCL Ocean shipments).
a. If no, continue onto the next process Step 5
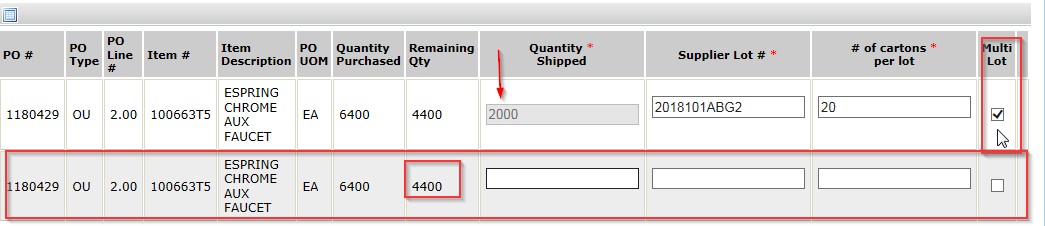
b. If yes, select the Multi Lot check box
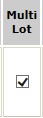
- and a new PO line is inserted below this line and decrements the partial quantity entered on the original line from the Quantity Purchased.
New lot lines can be created until the PO’s open quantity is at zero.
Important Notes:
1- on container shipment when using multiple lots, the  link disappears.
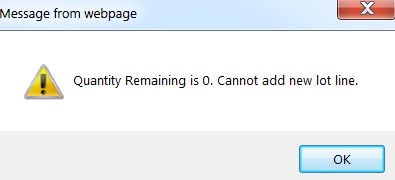
2 – if the total purchased quantity is entered in the quantity shipped and then Multi lot box is checked, on that line, a pop-up box shows:
a.To remove a lot qty line – simply uncheck the Multi Lot box, in the last line that has it checked and the new line directly below that row disappears.
In this example, 432 was used, no open qty. so uncheck the lot line above it:
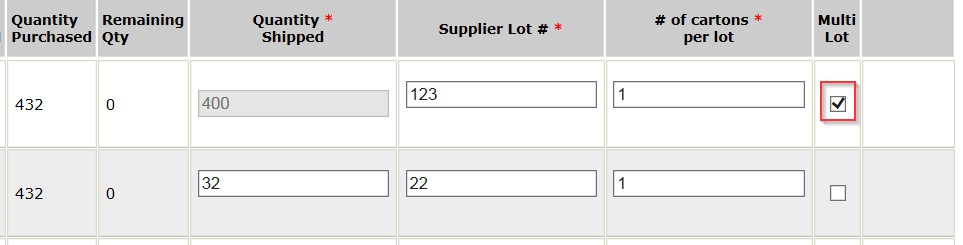
and the total qty comes back into remaining qty to revise by lot again from that point.
See the UNCOMMIT link comes back for use if the PO line is at the original line.

b.Or cancel the container shipment and start all over again.
i.Enter in all 3 fields for that quantity’s lot #. Notice that the previous lot quantity field is muted and locked down. If that muted lot line quantity needs to be adjusted, unchecking all the lot lines from that PO line, will free up that original line quantity. Lot # & carton fields are open.
**See the Multiple Containers section (Step 6 # 3) for the use of this  option.
NOTE: rechecking it again will default this row back in for data entry.

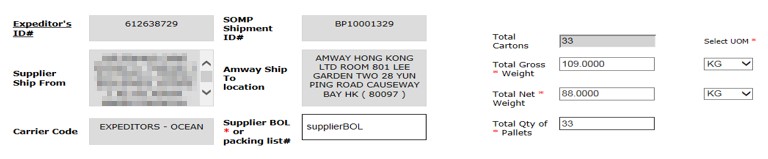
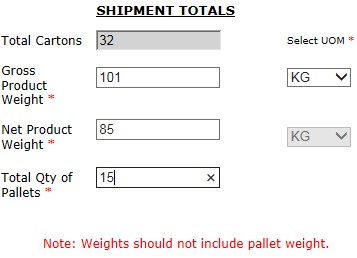
Step Five: Complete the Shipments Header information – [applicable for all: Air/Truck/Ocean]
All fields in the top of the form are required to be filled in order to submit the shipment.
Note that the Total Cartons field (which is muted from any manual entry); defaults in this quantity automatically by totaling all the cartons for all PO lines on this shipment – see the 64 qty example below.
Tab or click to each field:
Start with Supplier BOL/Packing list field #, enter in this exact number (not case sensitive). This is usually your system generated # (may be your invoice # also) – for tracking your shipment via your paperwork.
1. Total Gross weight (weight of entire packaged goods – NOT including pallets) – pallet weights must be eliminated from this total.
a .Select Gross: UOM in KG or LB – this same value defaults for Net weight field also
2. Total Net weight (weight of product only – NO packaging NOR pallets)
See Note on Header of form for these fields: 
3.Total Qty of Pallets (if no pallets or on slip sheets enter a zero “0”, blank field is not allowed)
Printing the information entered – Click 
- button on the bottom left of the form.
- All entered header and detail lines on that shipment will print out exactly as shown on this screen/form.
Excel downloading PO line shipment details by selecting the small box above the PO # in the shipment lines section:
Step Six: When shipment header & detail fields are completed and accurate, there are several options:
1. Completed shipments, Click 
A. This will submit shipment details into Amway’s system and allow for the PO line’s to be received.
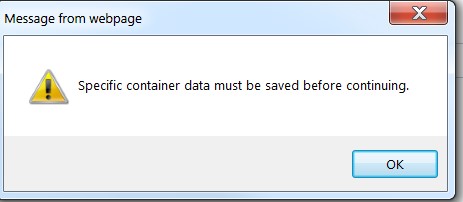
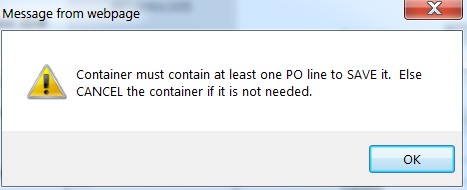
Note: for a single CONTAINER, clicking SAVE CONTAINER is required prior to submitting it.
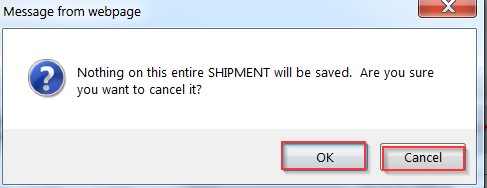
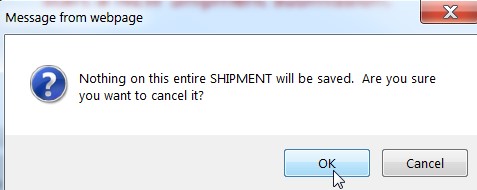
2. Cancel the shipment as it is not accurate and needs to be started over from the beginning,
Click 
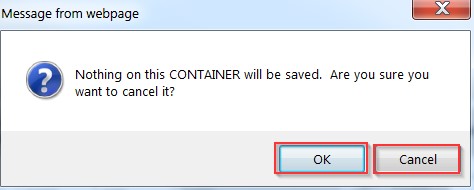
a pop-up box will ask to confirm that cancelling this shipment is OK
or click Cancel if you don’t want to cancel this shipment.
A. Click  (on bottom right of form) and this
  button appears by the Other Container(s) field:
Note the first container # is muted out now.
**See detailed multiple containers steps to continue with this process **

4. Save a Draft – For Expeditor only shipments: Click 
This allows for doing some of the shipment details – PROACTIVELY and then saving that work so it can be retrieved again to complete the rest of the data fields for it.
Notes:
A.that when retrieved, SOMP will revalidate all locations and dates are correct to enable toggling into shipment details form.
B. Container shipments must have accurate container ID #’s to save as DRAFT.
In either case, if shipment data changes, canceling the DRAFT and starting over is the only option.
**See detailed steps below to continue with this process on Step 8.
Step Seven: Multiple Containers
1. Adding a new container
As noted in Step 6. 3. above, once a container is completed & information is SAVED, the Container # field is muted (so this container # cannot be revised now) – the  button appears:
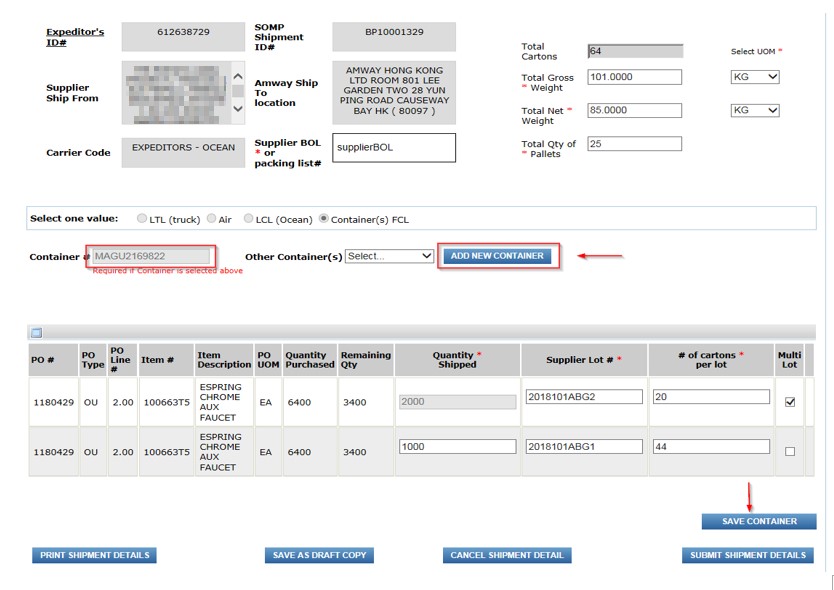
Clicking this 
will show a new header section and all the PO lines with open quantity.
A.Enter the next CONTAINER # for the product that went into it. See the first saved container # in the Other Container drop down list next to this field:
a.Repeat for as many containers that are housing these PO line items on this shipment.
b. Multiple lots can be used to be completely accurate on the quantities on that specific container.
c. Each PO quantity entered on any container will decrement remaining open PO line quantities until open quantity is zero.
IMPORTANT: If any open quantity is not used, the PO line should have been revised prior to the shipment submission. This is done via the PO Revision option in SOMP so Amway knows that quantity will not be delivered as acknowledged and can revise their plans to accordingly.
C. Revising Multiple Container data:
If it’s necessary to toggle back to another SAVED container to revise any data, simply Click the Other Container field:
 & select the container # desired & all that containers data will default into the form.
Note: SAVE (or Cancel it) the previous Container to toggle back or this pop up will appear:
a. Revising a container’s weight, pallet qty, UOM OR a specific PO line’s lot number or # of cartons
Simply edit the specific field information that isn’t correct. These open fields (white cells) will be not be muted out in grey. 
In this example, the wrong carton count was entered as 44 on this PO line and needs to be revised to 12:

Type in 12 and SAVE CONTAINER: 
See that the total carton count went from 64 down to 32. The shipment header gross/net weights & pallet qty’s must be validated again & revised also.
This was 25 pallets now 15:
SAVE CONTAINER if not clicked it already.
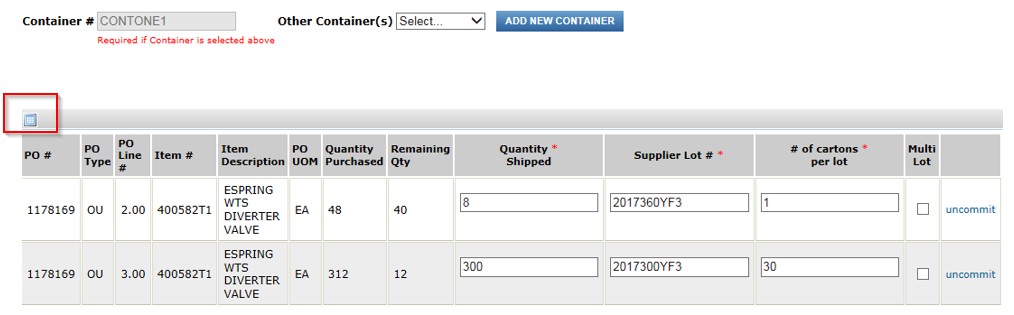
D. Deleting (uncommitting) a saved NON-multiple lot line quantity- within a container:
1. For Multiple PO lines within a container, an “uncommit” link  will display at the end of each PO line shipment quantity.
- This link allows for removal of the entire PO line quantity saved on a container, without having to cancel the whole container or shipment, to revise that one PO line to a different container.
- Uncommitting allows for that PO line quantity to be freed up to be entered into another container, within that shipment.
In this example below, this 4th SAVED container, has PO line quantity on it that was able to fit on the 2nd container. Select this 4th container, and go to the correct PO line to change (line 4):
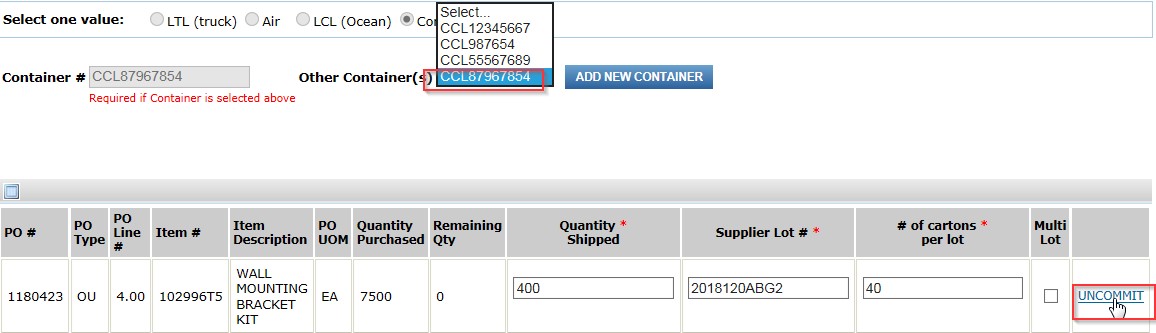
Clicking UNCOMMIT removes this 400 from Quantity Shipped and adds 400 back into the Remaining Qty field:

Click  to save that reopened PO line quantity of 400. This amount is basically a free line to add to another container.
Now toggle back to select the 2nd container  to revise that container:
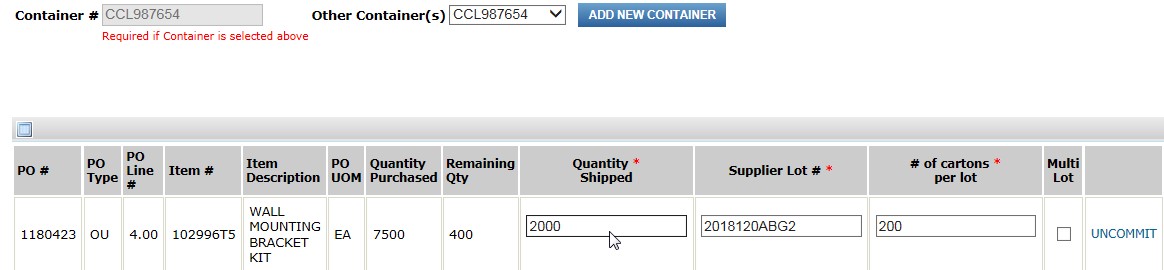
See that the uncommited 400 is now available, in the remaining qty field so this 2000 qty can be increased to 2400. Revise the carton count also and click 
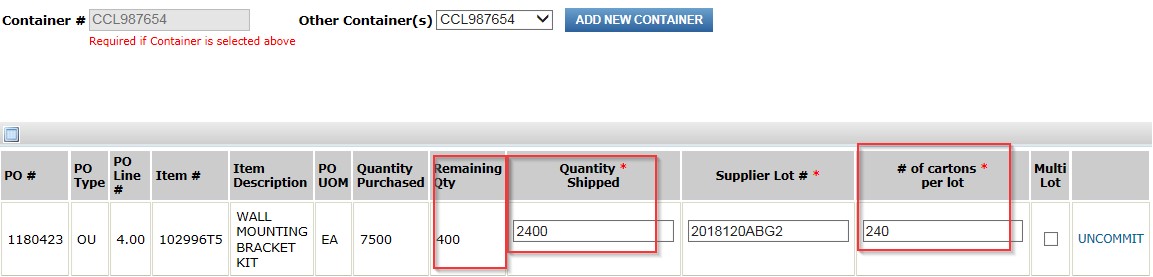
AND revise the header Total gross/net weight and pallet counts: 
Important Note: if there is only one PO line on a container, UNCOMMIT should not be used to delete this line from the container as the container will not be removed from the shipment. Instead use the CANCEL CONTAINER  functionality to remove the entire container.
If UNCOMMIT is used in error vs. cancel container, for a one PO line container, this pop up reminder shows up when toggling to another container:
1.If you don’t want to save this additional container, click  & this Pop-up box will ask to confirm this:
Clicking OK will cancel or delete this container, completely.
Clicking Cancel will go back to allow completing, saving as draft or saving the container.
a. Important Note on canceling a container on a multiple container shipment.
Any container other than the first one entered on this shipment, can be canceled one by one without affecting the whole shipment – the selection icon button says 
If, however, the first container is canceled, the entire shipment is deleted – see Step 6 .2 above.
This selection icon says: 
Step Eight: Saved as Draft shipment; retrieval & completion
Important Notes:
a. Only Expeditor shipments have this  option at the bottom of the form.
b. the first PO line on this shipment must have all 3 data fields entered in order to save as draft.
- Shipment header data is not required.
c. If it’s a container shipment, the Container # field must also be populated with the correct container #’s as this field may not be revised once entered. Canceling just one container on a multiple container shipment is possible to redo that specific container if the # is wrong. If it’s the first container, the whole shipment will need to be canceled and a complete redo is necessary.
d. DRAFT is not submitted so when all shipment data is retrieved, completing the draft is necessary.
e. Invoicing cannot be done in SOMP on a draft.
f. When a saved DRAFT is retrieved, SOMP will revalidate that all PO lines, locations and dates are correct to enable toggling into shipment details form.
- If there are any differences on this shipment now, from when DRAFT was saved, canceling this DRAFT and starting over is the only option so the other PO lines can be accurately managed via this shipment. See # 2 below for more details on this.
1. When steps b. & c.(above) are entered; Click  (note the other 4 buttons are visible)
2.To retrieve this DRAFT shipment to complete it or add more data
Note: If any of the PO data has changed that is on this draft when it’s retrieved again, it will be revalidated and the need to cancel this DRAFT and start again, may be necessary.
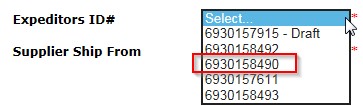
a. Click on the Expeditor ID# field to retrieve Expeditor # shipment – notice that the word Draft is next to it
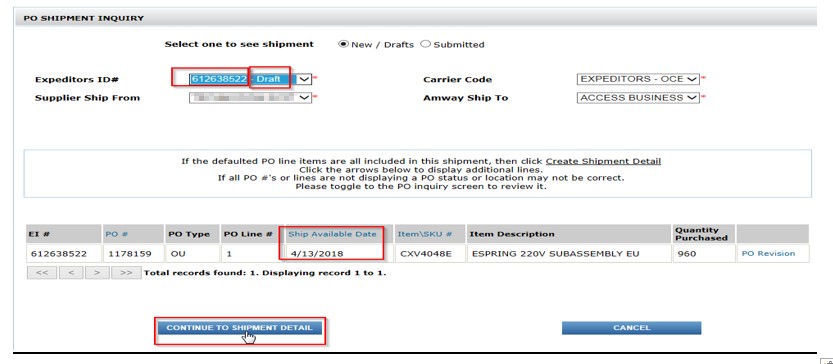
NOTE: If any of the shipment’s PO line data has changed from the draft being saved (ship to, ship from, carrier code, shipment ID #, etc.) – the number of PO lines defaulting below may be different.
b.Select the Continue to Shipment Detail button.
Notice that this shipment is validated again and now the ship available date is in the past and must be revised to move forward. Follow PO line revision steps – on page 7– in need more instructions.
- If all the shipment PO line data in the DRAFT is still accurate then– complete all the STEP 4 & 5 PO line fields and header fields – for that shipment.
Then any of the STEP SIX processes can be used again. Don’t forget the Print option is available at any point.
- IF any of the PO lines are not part of this same shipment, when the Draft was initially saved, this RED verbiage will show above the Container ID # field:

Clicking this button removes the draft and toggles back to the inquiry form to select this shipment ID # again.

Click OK on the pop-up box:
Step Nine: Submitted Shipment inquiry
This functions about the same as Step One for starting a shipment request, only it’s retrieval of a completed or fully submitted one.
1.Click Submitted radio button on the inquiry screen
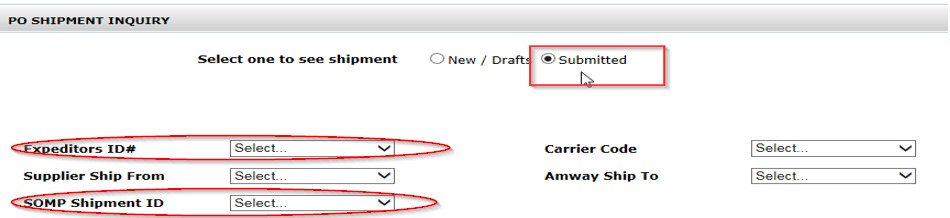
If you know the Expeditor ID # or the SOMP ID, click in that field(s) to select the correct one.
Then see the list of these shipments below.
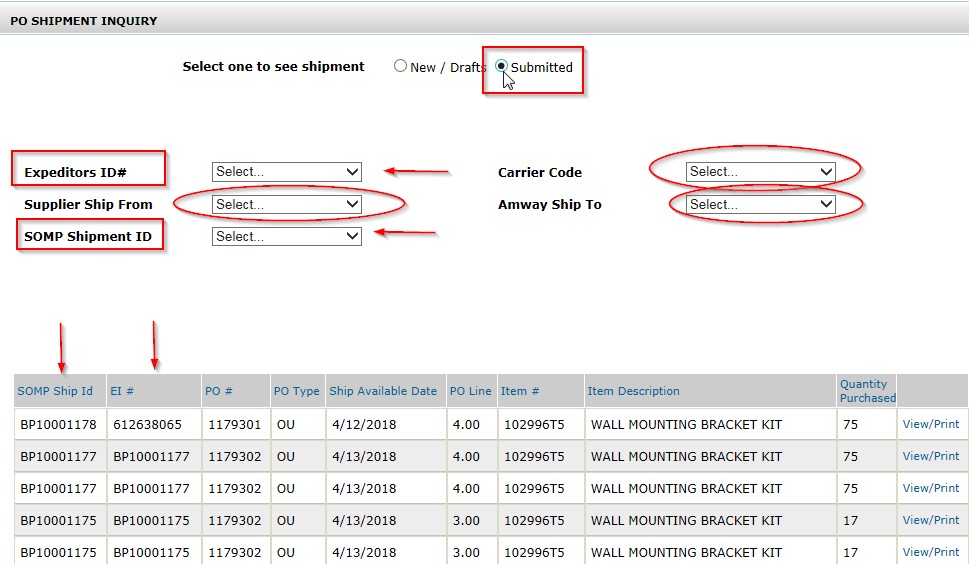
- Twenty-five PO lines show on a page. To see more use the arrows at the bottom of the form to go to the next page or the >> to go to the end:

See column one and 2 by each PO line: 
Note that if there were more than one lot on the same PO line, this will be shown by 2 lines in this list with the same SOMP/Expeditor # (see the BP10001177 example above) AND the PO’s total quantity purchased is the same in both lines. It was not submitted this way, click the view/print link to see the submitted breakdown of it.
If these don’t default in the shipment needed then use the other 3 (circled) filters to query up shipment:
To print use the button at the bottom of this new window to do so:

To close out of this VIEW/PRINT pop up window- click the top right Red X or the  just below that X: