Welcome to the help section
Invoicing
Click on the Heading to Proceed to the Section
Creating an Invoice:
To access the invoicing portion of the supplier portal, select either PO from the navigation bar or Invoice PO’s from the My Daily Tasks section.
If you choose the PO link, you must then select the Create Invoice radio button from the group for navigating to the correct screen.

In the Create Invoice screen, a listing of PO’s will be display. Supplier can search for specific PO’s utilizing the given search fields.
Select the Invoice hot link to the right of the PO # to create an invoice.
- Invoice – Creates a standard invoice with one Invoice # for one or more lines for any given PO.
Note: ALL PO’s will be displayed to create an Invoice even if they were previously invoiced. Please note for your reference which PO’s have been invoiced, so there aren’t multiple invoices for the same PO. We are aware of this issue and recognize it is a much needed improvement to the system, we are hoping to make improvements for this in the near future.
Duplicate Invoice # submissions are not allowed.

**IF you are unable to find a specific PO to Invoice, remove the Order Date From/To search filters & Select FIND.

1 – Creating a Standard Invoice
Click here to view tutorial on Creating a Standard Invoice
In the Invoice a Purchase Order screen, complete all of the applicable information. Required fields include Invoice #, Invoice date, Bill of Lading #, shipment date, A/R Contact Persons’ Name and email.
NOTE: Invoice# cannot contain special characters or spaces i.e; * / \ % # . If any special character or spaces are entered they will be automatically removed. Alphanumeric only.
NOTE: Bill Of Lading # cannot contain special characters or spaces. You will receive a hard stop error message and you will need to remove any special characters or spaces. If you do not have the BOL# at the time of invoicing, you can enter the invoice #. Alphanumeric only.
Invoices can only be back dated by 7 days.
Tax Info Supplier VAT # is required only for International Suppliers.

In the Invoice Item window, the PO lines ready for invoicing are displayed.
Check the boxes to activate the PO lines to invoice.
Reference the original quantity ordered and insert the quantity shipped for invoicing (Quantity Invoiced). The extended cost will calculate based on the invoice quantity and unit price.
For POs that require its own line for each shipment and therefore will need a separate invoice for each shipment, please follow these steps:
Enter your invoice number, along with all other pertinent information for this invoice.
Select only the PO line(s) that is associated with this invoice.
Reference the original quantity ordered and insert the quantity shipped for invoicing (Quantity Invoiced). The extended cost will calculate based on the invoice quantity and unit price.
Save and Submit for payment
NOTE: Go back and do the same steps above over again for submitting a new invoice number for a different line/shipment. Make sure you are only selecting the PO line that is associated with that invoice number.
For service type orders, the ability may exist to either enter in the quantity and/or the extended cost.

Miscellaneous Charges During Invoicing:
Additional charges can be added to the invoice, if needed. These charges should not be added separately if they are listed as purchase order as a specific miscellaneous line item.
NOTE: Miscellaneous charges such as artwork, setup, die, plate, and other charges known prior to invoicing should be added to the PO prior to this step. The miscellaneous charge request form for adding these charges is still available from the PO acknowledgement, revision, or inquiry screens. See the miscellaneous charge request help section. This is managed via your ABG buyer and added to the PO proactively so this PO line will show up when ready to submit your invoice.
To add an additional charge, during invoicing, click the drop-down arrow to select the correct misc. charge/allowance. You will then need to enter the amount and click the add button.
NOTE: DO NOT add any misc. charges during invoicing that exceed $2,000 USD. As these require buyer approval and manual addition to the purchase order. These requests should be emailed to your buyer directly.


Once the Invoice is ready, you can select Save & Submit or Save as Draft to complete the invoice at a later date.
To submit the Invoice for payment, you MUST SELECT SAVE & SUBMIT.
It will automatically be added to the PO after you select save and submit.

You will receive a pop up when the invoice is submitted successfully.
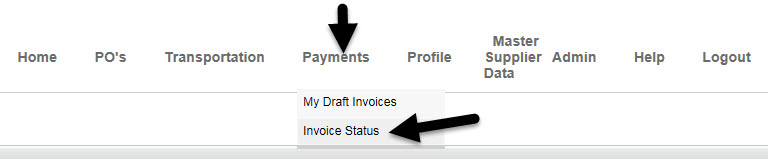
After submitting an invoice for payment, you can view the invoice status by navigating to Payment> Invoice Status. NOTE: Your invoice will not display here immediately after submission, please allow a few hours for the submission to be processed.
Saving an Invoice as draft:
Click here to view tutorial on Saving Invoice as Draft
Invoices can be either saved as draft to be completed at a later time or they can be submitted to Amway right away (Save & Submit).
Draft copies can be saved by clicking “Save” from the Create invoice screen. A message will be displayed to confirm draft invoice has been saved. This action will not submit any invoice information to Amway.

Draft invoices can be resumed by going to Payments/My Draft Invoices

The draft invoice screen will provide the following options:
- Print Saved Invoice
- Delete Saved Invoice
- View Draft Invoice by selecting Draft.
- To review draft invoice for submission, click Draft. The create invoice screen will open where the invoice information was left. To modify quantity on a draft invoice just uncheck the item line and check it again to have the Quantity Invoiced field available to be changed.
Additional charges and/or allowances can be added or deleted if needed as it was explained in this guide previously.
Once all charges are added and you have validated that all the information & inputted data/amounts are correct, select Save & Submit. Please make sure to review the entire invoice when Submitted from Draft to assure that all the data is completed. An invoice confirmation message will appear when the invoice is accepted.
After submitting an invoice for payment, you can view the invoice status by navigationg to Payment> Invoice Status. NOTE: Your invoice will not display here immediately after submission, please allow a few hours for the submission to be processed.